Zelle is a popular peer-to-peer payment service. It is just like Cash App that allows you to send and receive money instantly from your bank account. If you have a recurring Zelle payment set up, you can cancel it easily through your Chase account.
Transparency Note: My Cash Back Reviews is an independent site. I personally test banking app features and digital payment settings to provide honest, practical guidance. This post contains affiliate links; if you use my links to sign up for services I recommend, I may earn a small commission at no additional cost to you, which helps support this site.
In this blog post, I will show you how to cancel a recurring Zelle payment. I will also provide you with some additional tips for canceling a recurring Zelle payment.

Here’s how to cancel Zelle’s payment on Chase
Follow the steps below to stop a recurring Zelle payment on Chase. You can do this on their website or the Google app store:
- Log in to your Chase account.
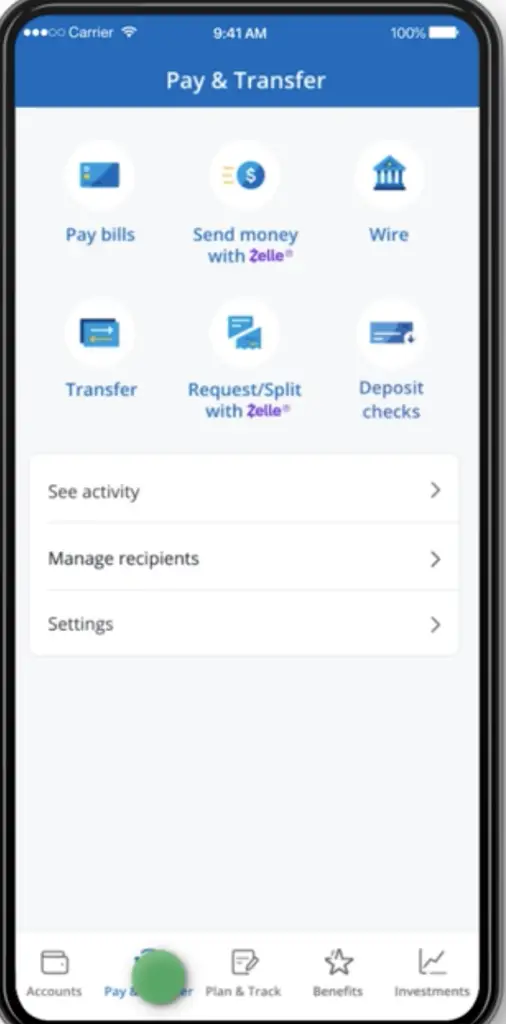
- Click on the “Pay and Transfer” tab.
- Click on “Zelle®.”
- Click on the “Manage Payments” tab.
- Select the recurring payment that you want to cancel.
- Click on the “Cancel” button.
- Confirm that you want to cancel the payment.

Your recurring Zelle payment will be canceled, and the money will not be sent.
💰 Money Management Tip: Now that you’ve organized your Chase payments, why not look for ways to add more cash to your balance? I’ve been using InboxDollars to earn extra money for simple tasks, which I then deposit directly into my bank account. Read my full InboxDollars Review to see how you can get a $5 signup bonus today.
Additional tips for stopping a recurring Zelle payment
- You can also cancel a recurring Zelle payment by calling their customer service.
- You can only cancel a recurring Zelle payment that has not yet been processed. If the payment has already been processed, you will need to contact the recipient to request a refund.
- If you have any problems canceling your recurring Zelle payment, you can contact Chase customer service for assistance.
How to cancel a recurring Zelle payment if the payment was made through a 3rd app
To cancel a recurring Zelle payment made through a third-party app, you have to contact the app’s customer support team. The specific steps involved in canceling a recurring payment will vary depending on the app, but most apps will have a way to cancel recurring payments through your account settings.
Steps on how to cancel a recurring Zelle payment through Venmo
- Open the Venmo app and sign in to your account.
- Tap the Profile icon in the bottom right corner of the screen.
- Tap Payments.
- Tap the recurring payment that you want to cancel.
- Tap Cancel.
- Confirm that you want to cancel the payment.
Steps to cancel a recurring Zelle payment through PayPal
- Go to the PayPal website and sign in to your account.
- Click on the Profile tab.
- Click on Recurring Payments.
- Find the recurring payment that you want to cancel and click on the Cancel button.
- Confirm that you want to cancel the payment.
Once you cancel the recurring payment, it will not be processed. However, if the payment has already been processed, you cannot cancel it.
Additional tips for canceling recurring Zelle payments through third-party apps
- Check that you cancel the recurring payment before the next payment is scheduled to be processed.
- Keep a record of the date and time that you canceled the payment, as well as the confirmation number. This information may be helpful if you need to contact the app’s customer support team later.
- If you are having trouble canceling the recurring payment through the app, contact the app’s customer support team for assistance.
If you have questions about stopping or canceling a recurring Zelle payment, you can contact Chase customer service for assistance.
My Personal Take on Managing Zelle Payments
I have accidentally set up recurring payments before, and the biggest lesson I’ve learned is that they are often “out of sight, out of mind” until your balance drops unexpectedly. My “Pro-Tip”: Always check your “Activity” or “Scheduled Payments” tab in your banking app immediately after setting up a Zelle transfer if you aren’t 100% sure you selected “One-time.” It takes five seconds, but it saves you the massive headache of having to reverse a payment that has already cleared. If you find a recurring payment you didn’t intend to create, cancel it at least 24 hours before the next scheduled date to ensure the system processes the request in time.
Conclusion
Phew, we made it! You’ve navigated the maze of options and successfully canceled that Zelle payment on Chase. Now, relax and relish the peace of mind knowing your funds are safely back in control. Remember, Zelle payments can be tricky, but you’ve proven yourself a cancellation champion with the right guidance!
Before you close this tab and move on, let’s recap some key takeaways:
- Act Swiftly: The sooner you initiate the cancellation process, the higher your chances of success.
- Double-Check Details: Triple-confirm the recipient’s name and amount before initiating any action.
- Know Your Options: Depending on the recipient’s enrollment status, options for cancellation may vary.
- Stay Calm and Carry On: If things get bumpy, don’t hesitate to contact Chase customer support. They’re there to help!
Consider this a crash course in Zelle cancellation – a valuable skill to have in your digital wallet. And hey, if you ever encounter another payment-related pickle, remember, there’s always a solution waiting to be unraveled. Just channel your inner cancellation maestro, and you’ll be back in control in no time!
So, go forth and conquer the digital landscape, friend! And may your future Zelle transactions be smooth sailing from here on out.
Bonus Tip: Share your newfound cancellation wisdom with your tech-savvy friends and family. After all, knowledge is power, and who knows, you might just become the go-to guru for all things Zelle conundrums!
I hope this blog post has helped you learn how to cancel a recurring Zelle payment on Chase. If you have any questions, please feel free to contact Chase customer service for assistance.
Frequently Asked Questions
Q: Can I cancel a Zelle payment if it has already been sent? A: Once a Zelle payment is sent and accepted by the recipient, it is nearly impossible to cancel because the money moves instantly between bank accounts. You should contact your bank’s support immediately, but in most cases, you will need to ask the recipient to send the funds back to you.
Q: Where do I find my scheduled Zelle payments in the Chase app? A: Log in to your Chase mobile app, tap on the “Pay & Transfer” menu, then select “Zelle.” From there, look for “Activity” or “Scheduled” to view and manage any upcoming recurring transfers.
Q: Is it safe to use Zelle for recurring payments? A: Zelle is designed for sending money to people you know and trust. While it is secure, it does not offer the same purchase protection as a credit card. Avoid using Zelle for recurring payments to strangers, businesses, or for purchases of goods and services.